Switching to Podman
Podman has been designed as a drop-in Docker replacement for most CLI options and Open Container Initiative (OCI) image building. However the architecture and key features differ, in most contexts Podman is actually better!
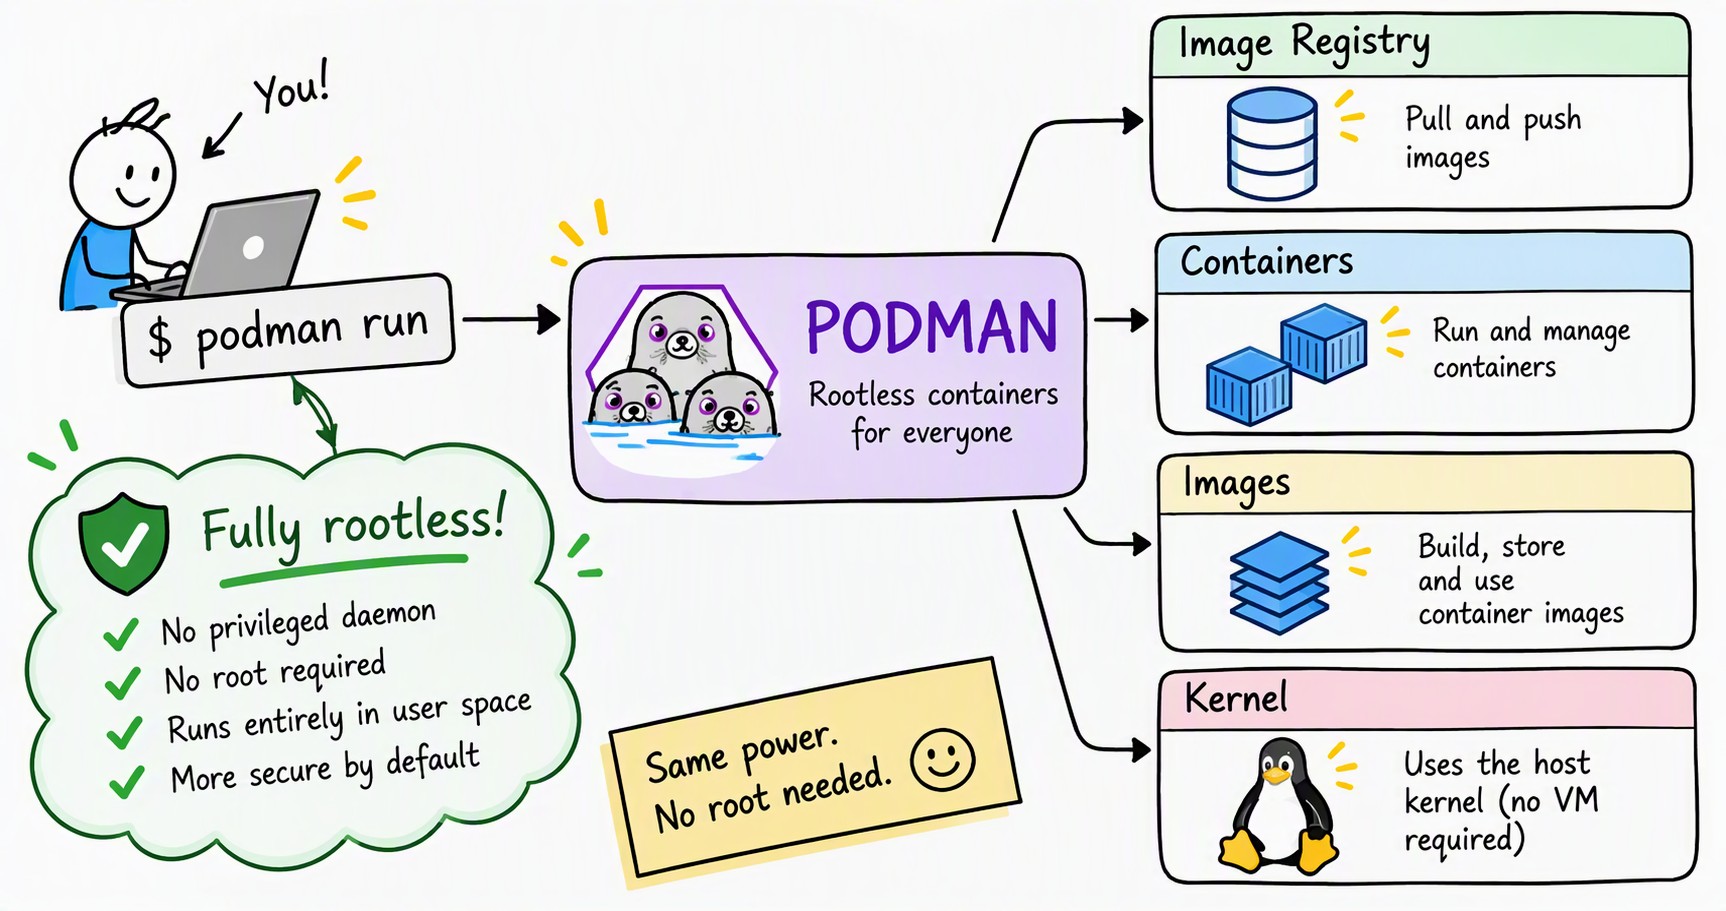
Podman does not rely on a privileged background daemon and is able to run rootless providing a better security stance. However you might run into trouble for specific use cases, like binding to network ports below 1024, or using tools that rely on proprietary Docker features.
In this post I compare both tools and provide an overview of how to get Podman up and running for different operating systems.
Docker vs. Podman
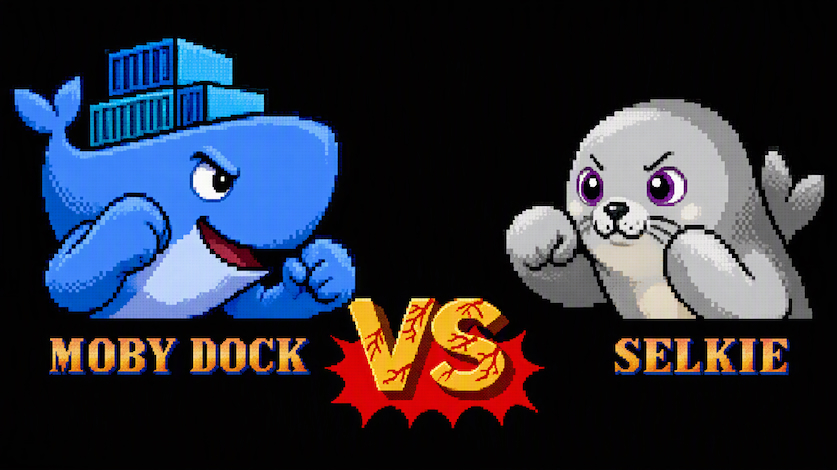
This picture of the Docker mascot and the Podman mascot in a Street Fighter-style title screen was generated using AI, no animals were hurt!
The Docker Engine was first released in 2013 and it was quite disruptive at the time. Virtualization had finally taken hold as a much more practical way to manage your servers, and the concept of a lightweight package that could be easily deployed anywhere immediately proved useful.
The metaphor behind the project was powerful and simple. A shipping container neatly isolates its contents (the goods being transported) from the logistical chain (the vehicle that actually moves things around). A shipment of bananas will travel by ship side by side with user electronics. Upon arriving at port both containers are unloaded onto trucks that will take the load to their final destination. You don’t need special boats or trucks to carry bananas, these vehicles just need to be prepared to carry containers.
A software container does the same: you package your software, then deploy it anywhere, from a developer’s machine to a cluster or a managed serverless service. No more “but it worked on my machine”: building and distributing software became a lot easier. Beyond the idea itself, Docker’s open-source nature helped drive adoption.
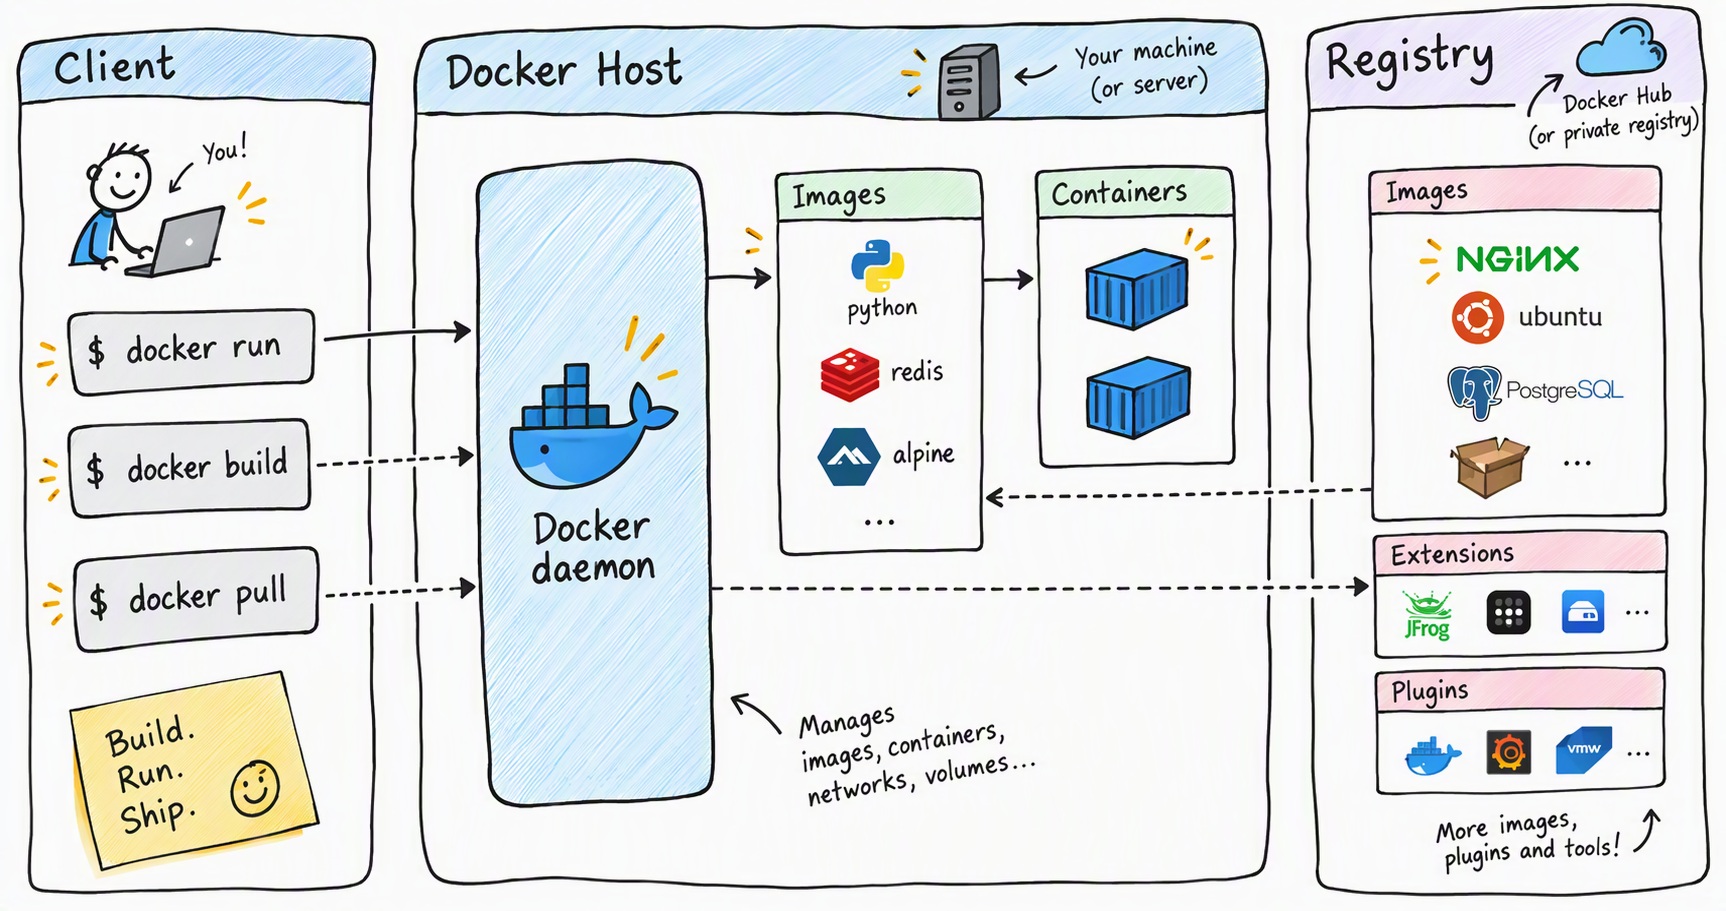
Here’s a view of the Docker architecture, inspired in the official architecture diagram (original source: docs.docker.com). The architecture follows the classic client-server pattern. The userspace client communicates with a daemon that runs with elevated privileges.
Fast forward to today, the ecosystem has flourished. Docker Engine is still open source, but Docker Desktop requires a paid license for some organizations. The Open Container Initiative (OCI) handles open industry standards for container formats and runtimes. Many tools use those standards.
I’m interested in a tool that supports my local development workflow, and I decided to make a comparison with Podman. The fact that it is fully open source but has a well-established corporate sponsor makes it a credible choice. Let’s see how they fare against each other.
Let’s have a look at the Podman architecture (original source: developers.redhat.com). The main advantages are that it’s daemonless and rootless. Containers are a native Linux technology, so Podman excels there. For other operating systems Podman will actually need a virtual machine (exactly as Docker).
After evaluating Podman, I decided to migrate. Its architecture is more modern and secure while remaining compatible with familiar container workflows. One study found Podman faster in most operations, though results may vary with the configuration and operating system.
| Feature | Docker | Podman |
|---|---|---|
| Architecture | Uses the dockerd daemon |
Daemonless |
| Security | Runs as root by default; rootless mode is available | Rootless by default; privileged ports (0-1023) may require extra configuration |
| License | Docker Engine is open source, other tools are proprietary | Fully open source |
| CLI | docker |
podman uses the same options as docker |
| GUI | Docker Desktop is closed source and requires a paid license for some organizations | Podman Desktop is open source and free to use |
| Orchestration | docker-compose, Docker Swarm |
podman-compose or docker-compose, no Swarm support but you can use local kubernetes |
Podman on Linux
To install on Linux, the easiest path is to use your distribution’s native
package management system. I’ll provide an example using apt, as I’m running
Ubuntu. Installing podman and running “hello world” in a rootless configuration
is as simple as:
sudo apt update && sudo apt install -y podman
podman run hello-world
When using Rootless Podman, container UID 0 (root) is mapped to your host user’s UID, while other container UIDs map into your configured subuid range, isolating the container from host root privileges.
You may encounter permission issues when bind-mounting a volume into your container. A likely cause is that your host UID differs from the UID inside the container.
The podman unshare
command allows users to run commands within a modified user namespace used by
rootless Podman containers.
When you execute podman unshare, your user’s UID and GID appear as 0 (root)
within the namespace.
This is the way to go when you need to perform operations that would typically require root access, such as changing file ownership, or when you need to have full control over the container’s network stack.
Example commands:
podman unshare id, displays the UID and GID inside the user namespace.podman unshare cat /proc/self/uid_map, shows UID mappings between the host and the namespace.podman unshare chown 1000:1000 /workspace/volume, changes ownership of a directory for container access, use theuid:gidthat you will need inside the container.podman unshare --rootless-netns ip addr, show rootless netns information in user namespace for rootless containers.
The unshare command is not available for remote clients. The remote API does
not provide access to execute commands on the host directly.
To run commands in the VM, connect with podman machine ssh.
Podman on macOS
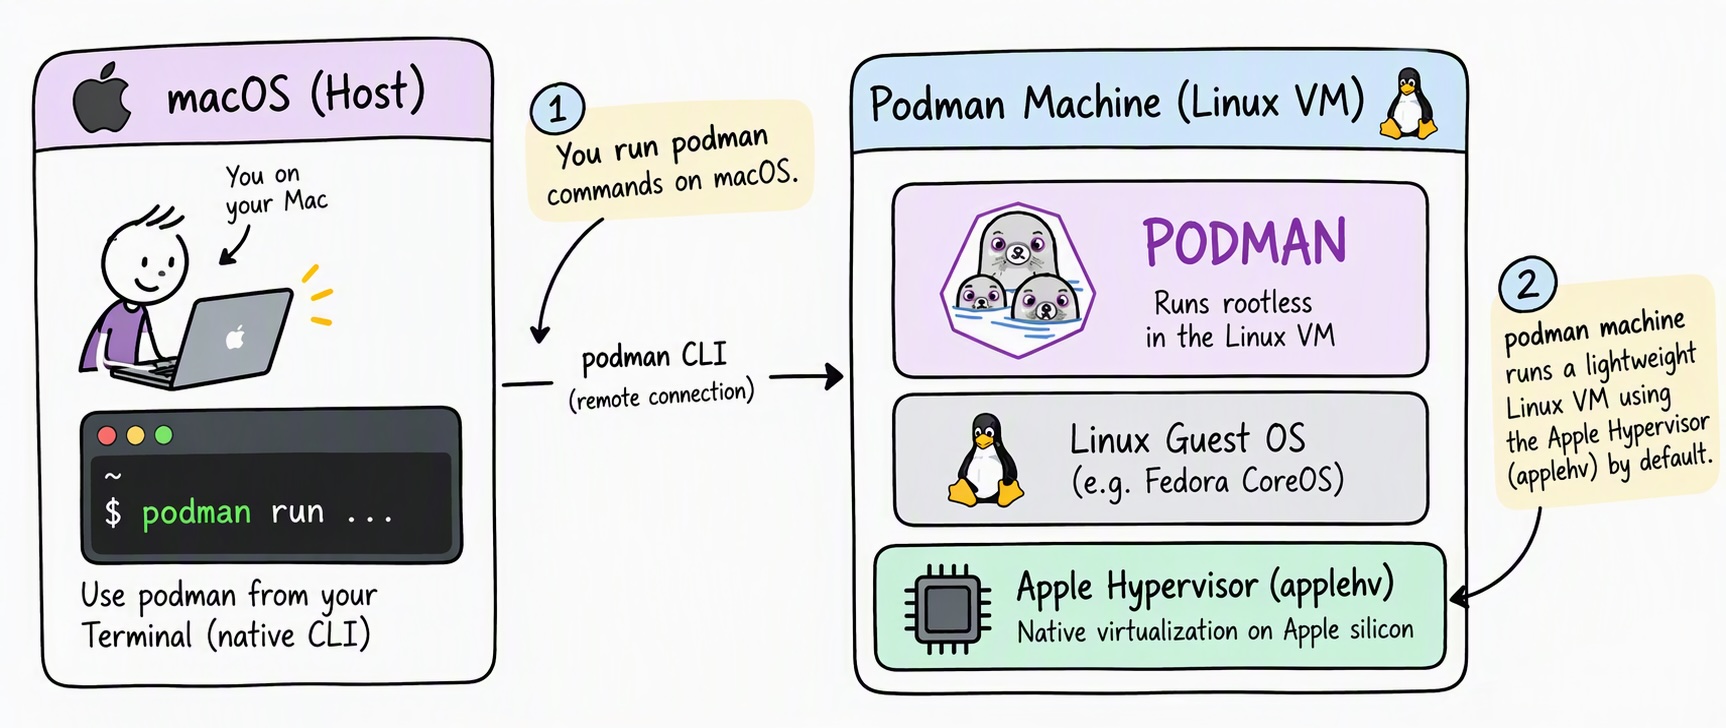
Containers rely on the Linux kernel. When running on another OS
Podman must spin up a small Linux virtual machine behind
the scenes to host and run container processes. By default applehv, Apple’s
native Hypervisor Framework
will be used.
Get started with:
brew install podman
podman machine init
podman machine start
podman run hello-world
The podman unshare command will be unavailable, but you can use
podman machine ssh to connect to the VM host and debug issues.
Use podman help machine to see a list of other commands or check the
podman machine reference
for more information.
Although the VM adds very little overhead, it still needs to be managed. Choose the approach that works best for you:
- Start and stop manually using the CLI
- Start it automatically using launchd
- Let everything be handled by Podman Desktop
I personally dislike taskbar pollution and I want to maximize resources, so I’ve defaulted to handling everything manually.
Podman on Windows
The architecture on Windows is quite similar to the macOS one. You will need a Podman machine, and the default will be using Windows Subsystem for Linux to provide the necessary Linux environment.
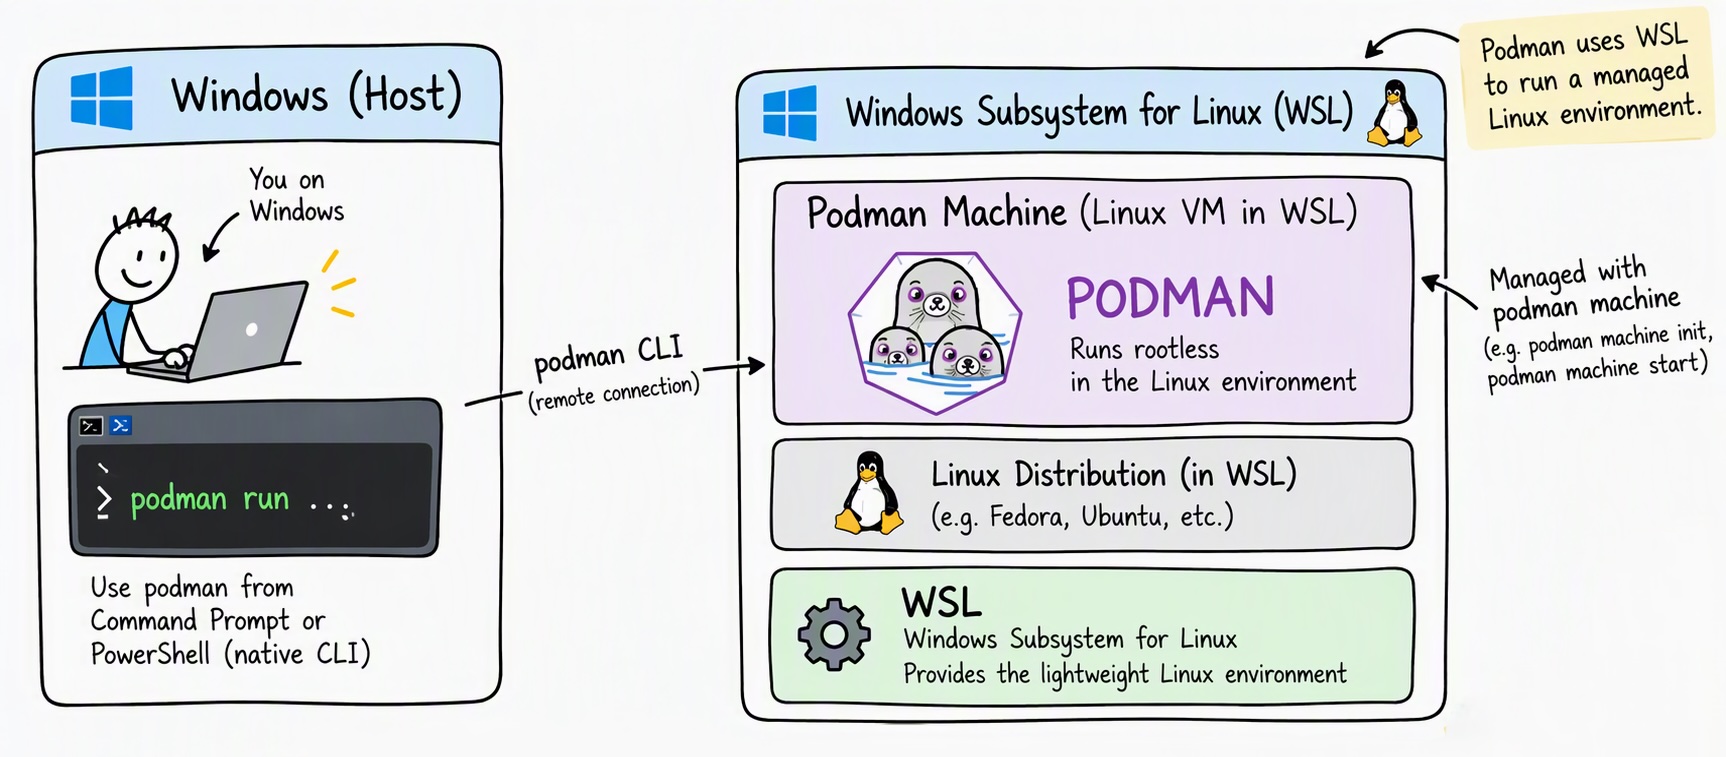
Again it’s entirely optional to use Podman Desktop, you can manage the Podman machine using the CLI.
Dev Containers
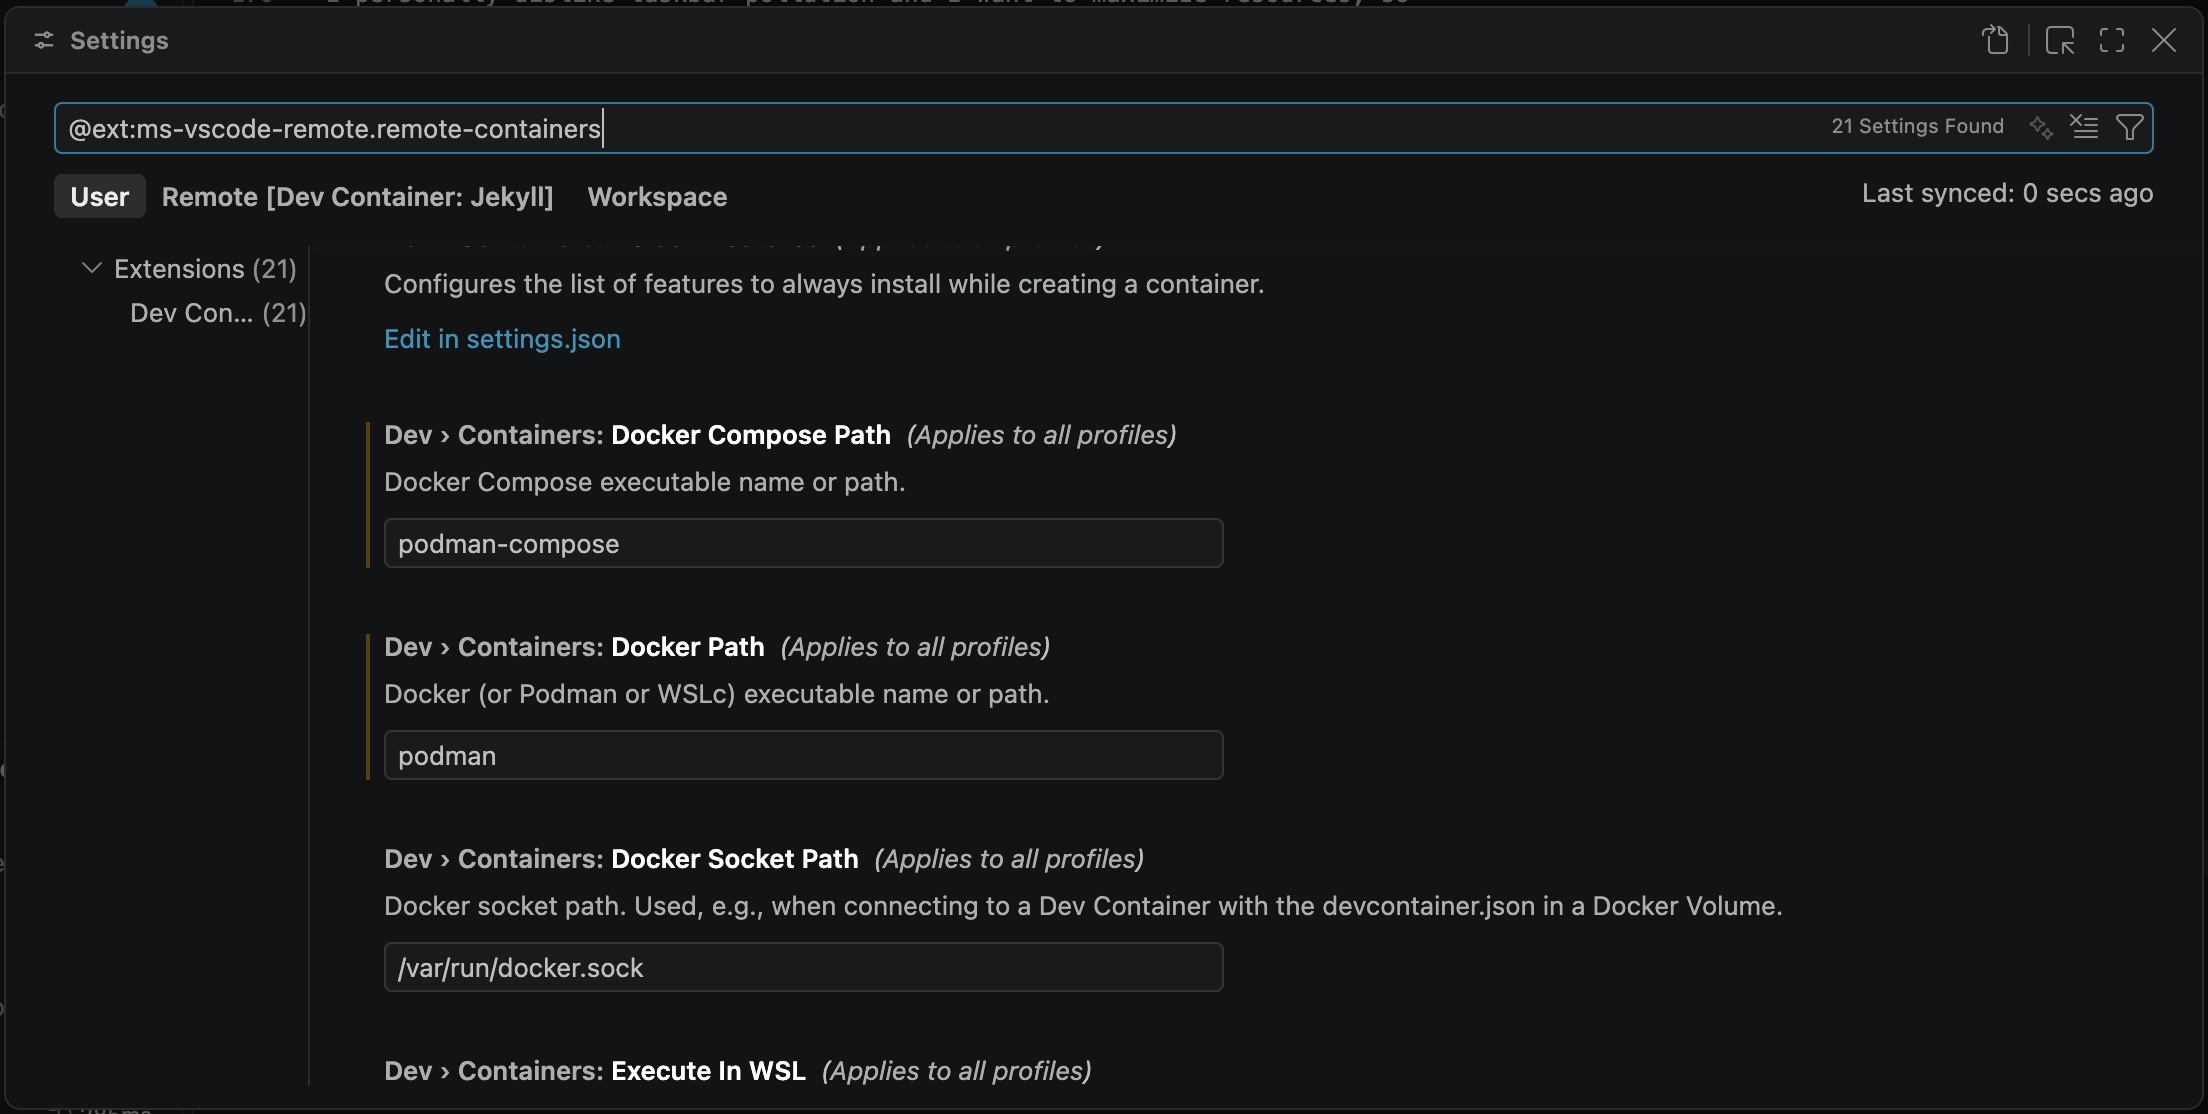
Not being able to use Dev Containers with Podman would have been a deal-breaker for me. The good news is that it’s easy to configure the VS Code extension to use Podman, and it has worked flawlessly.
From the VS Code command palette choose “Dev Containers: Settings”, scroll
down to the “Docker Path” setting, type podman and you’re set! You
can also set “Docker Compose Path” to podman-compose if you’re using it.
In my experience there’s no need to mess around with the “Docker Socket Path”.
Attribution
The post was written by me, and reviewed by AI for grammar and technical correctness. The images were generated using AI. All sources and references have been linked.